
Mealworms (Tenebrio molitor) are one of the most widely farmed feeder insects in the world. Thanks to their high nutritional value, efficient reproduction cycle, and relatively simple farming requirements, mealworms have become an important food source for reptiles, birds, small mammals, poultry, and other animal industries.
As demand for natural and sustainable animal feed continues to grow, more breeders and entrepreneurs are exploring mealworm farming as a scalable business opportunity. Compared with many other livestock operations, mealworm production requires less space, lower resource consumption, and can be adapted for both small-scale breeders and commercial insect farms.
However, successful mealworm farming depends on more than simply keeping insects in a container. Maintaining proper environmental conditions, managing different growth stages, controlling moisture levels, and developing an efficient harvesting system are essential for achieving stable production.
In this guide, we will walk through the complete mealworm farming process, from setting up your first colony to improving production efficiency and preparing mealworms for the market.
Step 1: Setting Up Your Mealworm Farm
A successful mealworm operation starts with creating the right farming environment. Mealworms are relatively easy to raise, but they require stable temperature, proper ventilation, and controlled humidity to achieve healthy growth and high reproduction rates.
Choosing the Right Location
When selecting a location for your mealworm farm, focus on three key factors: temperature stability, airflow, and protection from extreme conditions.
Maintain a Cool and Stable Environment
Mealworms perform best in temperatures between 77–86°F (25–30°C). A stable environment helps accelerate larval growth and supports better reproduction.
Suitable locations may include:
- Dedicated insect farming rooms
- Warehouses
- Basements
- Temperature-controlled storage areas
Avoid areas exposed to direct sunlight or sudden temperature fluctuations, as excessive heat can reduce survival rates.
Control Moisture and Ventilation
Humidity management is one of the most important factors in mealworm production.
Excess moisture can lead to:
- Mold growth
- Mite infestations
- Poor larval development
- Increased mortality rates
Maintain good airflow throughout the farming area while avoiding excessive humidity. Proper ventilation helps create a healthier environment and reduces the risk of colony problems.
Essential Equipment for Mealworm Farming
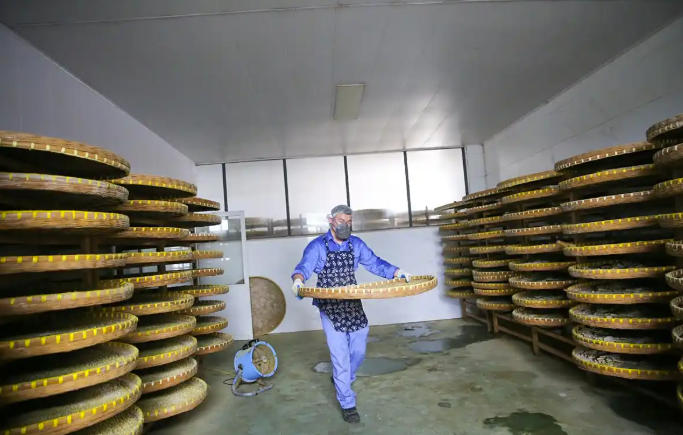
A small starter operation can begin with basic equipment, while larger farms may require specialized systems for efficiency and labor reduction.
| Equipment | Purpose | Benefits |
|---|---|---|
| Plastic Farming Bins | Housing larvae and beetles | Easy to manage and stack |
| Screening Sieves | Separating larvae, eggs, and frass | Improves colony management efficiency |
| Thermometer & Hygrometer | Monitoring environmental conditions | Helps maintain stable conditions |
| Storage Trays | Organizing different growth stages | Makes harvesting easier |
| Heating Equipment | Maintaining temperature in colder seasons | Supports year-round production |
Choosing Farming Containers
Plastic bins are commonly used because they are:
- Affordable
- Lightweight
- Easy to clean
- Suitable for stacking
For commercial production, many breeders use multiple containers to separate different stages of the mealworm life cycle:
- Egg and early larvae bins
- Growing larvae bins
- Pupae containers
- Beetle breeding containers
Separating life stages helps improve survival rates and makes production more predictable.
Step 2: Selecting Healthy Starter Mealworms
Starting with high-quality starter stock is one of the most important steps in building a successful mealworm farming operation. The quality of your initial colony directly affects future reproduction rates, growth performance, and overall production efficiency.
When purchasing starter mealworms, avoid choosing suppliers based only on the lowest price. Healthy genetics, proper handling, and reliable sourcing are much more important for establishing a stable breeding colony.
Where to Source Starter Mealworms
Choose suppliers with experience in feeder insect production and a proven track record. Reliable sources should provide:
- Healthy and active mealworms
- Properly maintained breeding colonies
- Consistent quality across batches
- Clear information about production methods
Many new growers make the mistake of focusing only on the initial purchase cost. However, starting with weak or unhealthy stock can result in slower growth, lower reproduction rates, and higher replacement costs later.
How to Identify Healthy Mealworms
Before introducing mealworms into your farm, check the quality of the larvae carefully.
Active Movement
Healthy mealworm larvae should move actively when disturbed. Slow movement, unusual behavior, or large numbers of inactive larvae may indicate poor health or improper storage conditions.
Uniform Size and Development
A consistent batch of larvae makes production management easier. Similar-sized mealworms typically develop more evenly, allowing for better feeding schedules and harvesting plans.
Clean Appearance
Healthy mealworms should have a smooth, golden-brown appearance without signs of mold, unusual discoloration, or excessive dead insects.
Step 3: Feeding and Managing Your Mealworm Colony
Proper feeding and colony management are essential for maintaining continuous production. A successful mealworm farm depends on creating a balanced environment where larvae can grow efficiently and adult beetles can reproduce consistently.
Choosing the Right Feed
Mealworms primarily feed on dry grain-based materials, which provide energy and support healthy development.
Common feed materials include:
| Feed Type | Examples | Purpose |
|---|---|---|
| Dry Feed | Wheat bran, oat bran, wheat flour | Provides energy and supports larval growth |
| Moisture Sources | Carrot slices, potato pieces, vegetable scraps | Provides hydration and essential nutrients |
Wheat bran is one of the most commonly used substrates because it is affordable, easy to store, and widely available.
Fresh vegetables can provide moisture, but they should be used carefully. Excess moisture can quickly create problems such as mold growth and mite infestations.
Feeding Management
Avoid overfeeding or adding excessive fresh food at one time. Uneaten vegetables should be removed before they begin to spoil.
A good feeding routine should:
- Maintain clean bedding conditions
- Prevent excessive humidity
- Ensure all larvae have access to food
- Reduce waste and labor requirements
For commercial farms, consistent feeding schedules are important for maintaining predictable growth cycles.
Temperature and Humidity Control
Environmental management plays a major role in mealworm production efficiency.
Temperature
Mealworms generally perform best between 77–86°F (25–30°C).
Within this range:
- Larvae grow faster
- Development cycles become more predictable
- Beetles reproduce more efficiently
During colder months, farms may need additional heating solutions to maintain stable production.
Humidity
Mealworms require moderate humidity levels, but excessive moisture should always be avoided.
High humidity can increase the risk of:
- Mold outbreaks
- Mite problems
- Larval losses
Maintain good ventilation and monitor moisture levels regularly to keep the colony healthy.
Managing Different Growth Stages
A professional mealworm farming system should separate insects based on their development stage.
The mealworm life cycle includes:
- Egg Stage – Eggs hatch into small larvae after several days.
- Larval Stage – This is the main growth stage and the stage most commonly harvested as feeder insects.
- Pupal Stage – Larvae transform into pupae before becoming adult beetles.
- Beetle Stage – Adult beetles reproduce and continue the production cycle.
Separating these stages helps improve:
- Survival rates
- Breeding efficiency
- Harvest consistency
- Production planning
A well-managed colony allows growers to maintain continuous production instead of relying on repeated purchases of starter insects.
Step 4: Harvesting and Processing Mealworms
Harvesting is an important stage in mealworm farming because proper handling directly affects product quality, shelf life, and customer satisfaction.
Depending on your target market, mealworms can be sold as live feeders, dried insects, or processed insect products. Each format requires different harvesting and handling methods.
Harvesting Live Mealworms
Live mealworms are commonly supplied to:
- Reptile breeders
- Pet stores
- Bird keepers
- Exotic animal suppliers
When harvesting live mealworms, maintain careful handling procedures to reduce stress and protect insect quality.
Recommended practices include:
- Separate harvested larvae from excess substrate
- Remove damaged or unhealthy insects
- Use breathable packaging for transportation
- Keep proper temperature conditions during storage and shipping
For commercial suppliers, consistent size and quality are important factors that influence customer retention.
Producing Dried Mealworms
Dried mealworms are popular because they offer:
- Longer storage periods
- Easier transportation
- Reduced handling requirements
- Wider market opportunities
The basic processing process includes:
1. Preparation Before Drying
Before processing, growers typically separate harvested larvae from feeding substrate and remove unwanted materials.
A short fasting period may be used before processing to help clean the digestive tract and improve product quality.
2. Heat Treatment
Mealworms should be properly treated before drying to ensure product safety and maintain quality.
Avoid using chemicals or substances that may create risks for animals consuming the finished product.
3. Drying Process
Proper drying is essential for long-term storage.
The goal is to reduce moisture content sufficiently to prevent:
- Mold growth
- Product spoilage
- Quality degradation
Commercial operations often use controlled drying equipment to achieve consistent results across large batches.
4. Packaging and Storage
After drying, mealworms should be stored in clean, dry, airtight packaging.
Good packaging helps maintain:
- Freshness
- Nutritional value
- Appearance
- Longer shelf life
For wholesale customers, professional packaging and labeling can also improve product credibility.
Step 5: Building a Mealworm Business and Finding Buyers
Producing healthy mealworms is only one part of building a successful insect farming operation. Developing reliable sales channels is equally important for long-term growth.
The growing demand for feeder insects has created opportunities across multiple markets.
Potential Markets for Mealworms
Reptile and Exotic Pet Industry
This remains one of the largest markets for mealworms.
Customers include:
- Reptile stores
- Breeders
- Pet supply companies
- Exotic animal distributors
Bird Feed Market
Dried mealworms are widely used as a high-protein food source for:
- Wild birds
- Backyard bird feeding
- Specialty bird suppliers
Animal Feed Applications
As interest in alternative protein sources increases, mealworms are also being explored for broader animal nutrition applications.
Potential markets include:
- Poultry feed
- Aquaculture feed
- Specialty animal diets
Developing Long-Term Customer Relationships
Successful mealworm producers focus on consistency rather than one-time sales.
Important factors include:
Reliable Supply
Customers need suppliers who can provide stable quantities throughout the year.
Consistent Quality
Maintaining similar size, appearance, and nutritional quality helps build trust with buyers.
Professional Communication
Clear information about:
- Product specifications
- Packaging options
- Minimum order quantities
- Shipping methods
can help establish long-term partnerships.
Scaling Your Mealworm Production
Once a farming operation becomes established, improving efficiency becomes the key to profitability.
Common scaling strategies include:
- Increasing breeding capacity
- Improving container organization
- Automating feeding and screening processes
- Optimizing climate control systems
- Reducing labor requirements
A successful mealworm farm is built through continuous improvement, careful colony management, and strong relationships with customers.
Common Mistakes in Mealworm Farming
Even experienced growers can face challenges. Understanding common problems can help prevent production losses.
Excessive Moisture
Too much moisture is one of the most common causes of problems in mealworm farming.
Possible causes:
- Overfeeding fresh vegetables
- Poor ventilation
- Wet bedding materials
Possible results:
- Mold growth
- Mite outbreaks
- Reduced colony health
Maintaining proper airflow and moisture control is essential.
Overcrowding
When too many mealworms are kept in a limited space, competition increases and growth performance may decline.
Signs of overcrowding include:
- Slow development
- Increased mortality
- Difficulty maintaining clean conditions
Regular separation and proper stocking density help maintain healthy colonies.
Poor Colony Management
Many production problems come from failing to separate different growth stages.
Mixing eggs, larvae, pupae, and beetles together can reduce breeding efficiency and make harvesting more difficult.
A structured production system allows growers to monitor each stage and maintain a continuous supply.